- この記事で行われるMacローカルでのRStudio Server(RStudioサーバー)の構築法は推奨しておらず(2020年9月13日現在)、この記事に辿り着かれた方は、下記の記事で、Dockerを使ったRStudio Serverの構築法を参照ください。
- はじめに
- macOS X編 RStudio ServerのインストールのTips*3
- 続けて、RStudio Serverの設定が必要である。
- OpenSSLのダウングレードとスイッチが必要である
- できればやってほしい、Nginxを使った8787ポートのリダイレクト設定
- 最後に
- 補足(1)HPにアクセスして、RStudio Desktop をインストールする場合
- 補足(2)Homebrewで、R/RStudiのデスクトップ版をインストールする場合
- 参考文献
この記事で行われるMacローカルでのRStudio Server(RStudioサーバー)の構築法は推奨しておらず(2020年9月13日現在)、この記事に辿り着かれた方は、下記の記事で、Dockerを使ったRStudio Serverの構築法を参照ください。
はじめに
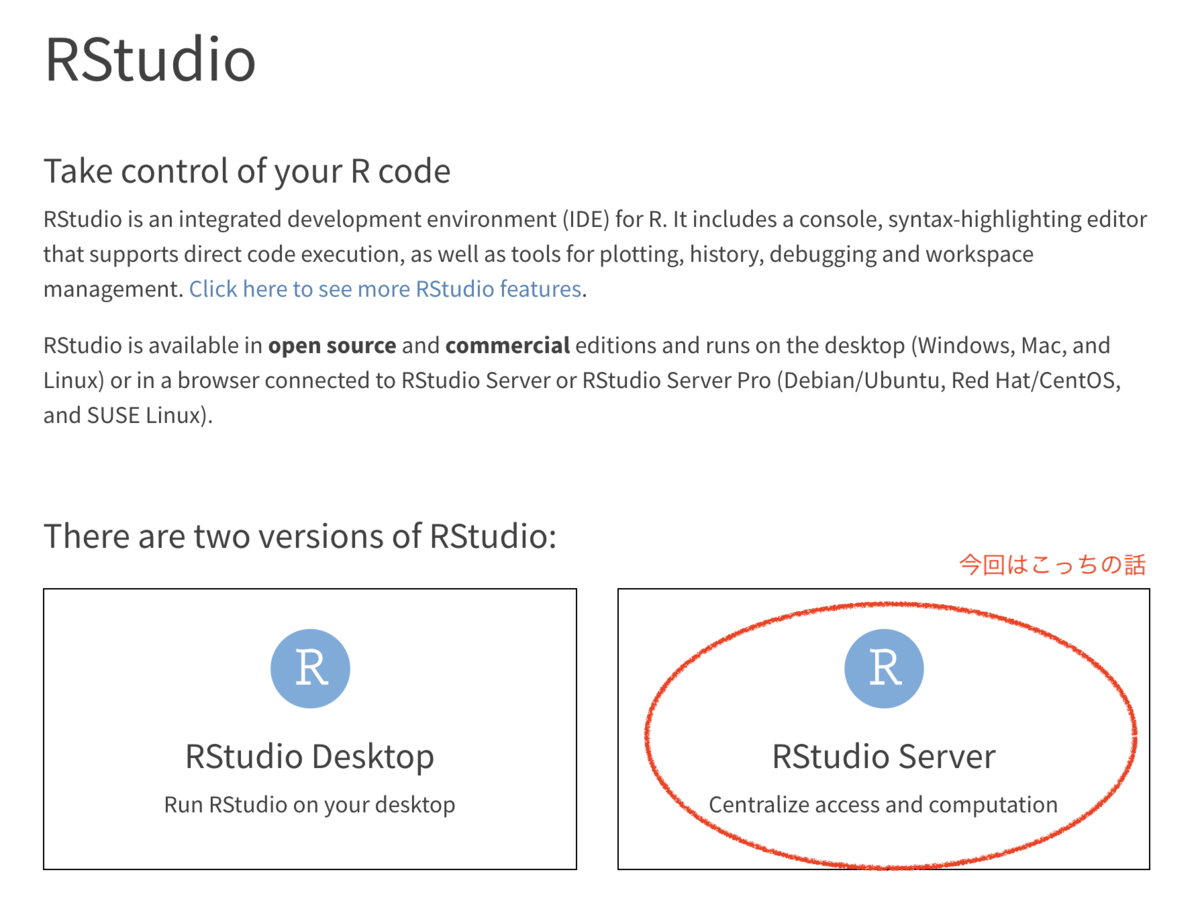
RStudio Serverは、PCやサーバー上で動作する、R言語のブラウザベース・インターフェイス(ブラウザ型RStudio)である。 通常、クライアントPCで計算コストが高い作業をすると、当然PCが別作業で使えなくなる*1。 そこで別にPCやサーバーがネットワーク上にあれば、そちらで高負荷な計算を実行しておいて、手元のPCでは別作業できる環境が、RStudio Serverで簡単に作れてしまう。
RStudio Serverには、一般的なブラウザ(Chrome、Firefox、Safariとか)でアクセスできるので、RStudio Serverごとに別作業できたりする。
RStudio Serverのインストールと設定は初心者には難しいけど、このTipsを読めば、簡単にできる*2。
macOS X編 RStudio ServerのインストールのTips*3
実行環境
iMac (Retina 5K, 27-inch, Late 2015)
macOS Catalina 10.15.4
Rとか関連パッケージをHomebrewでインストールする
いつも通り、brew コマンドでパッケージを入れる。
$ brew update                             # 念のために
$ brew install r openssl ant
$ brew tap randy3k/r
$ brew install r-x11
RStudio Serverをインストールする
rstudio-serverは brewsci/base にあるので、tapで追加する。
$ brew tap brewsci/base
$ brew install rstudio-server
このとき、下記のようなエラーが出た場合には、
Error: The following directories are not writable by your user:
/usr/local/share/man/man5

You should change the ownership of these directories to your user.
  sudo chown -R $(whoami) /usr/local/share/man/man5

And make sure that your user has write permission.
  chmod u+w /usr/local/share/man/man5
メッセージの指示通り、コマンド実行して、man5 フォルダの書き込み権限を変える。
$ sudo chown -R $(whoami) /usr/local/share/man/man5

$ chmod u+w /usr/local/share/man/man5
実際には、Rstudio Serverのインストールがうまくいけば、こんな感じになる。
$ brew install rstudio-server
==> Installing rstudio-server from brewsci/base
==> Downloading https://linuxbrew.bintray.com/bottles-base/rstudio-server-1.2.50
==> Downloading from https://akamai.bintray.com/25/255ef12e823fc4f2a3e4c3f673cda
######################################################################## 100.0%
==> Pouring rstudio-server-1.2.5001.mojave.bottle.tar.gz
Warning: brewsci/base/rstudio-server dependency gcc was built with a different C++ standard
library (libstdc++ from clang). This may cause problems at runtime.
==> Caveats
- To test run RStudio Server,
    /usr/local/opt/rstudio-server/bin/rserver --server-daemonize=0

- To complete the installation of RStudio Server
    1. register RStudio daemon
        If it is an upgrade or the plist file exists, unload the plist first
        sudo launchctl unload -w /Library/LaunchDaemons/com.rstudio.launchd.rserver.plist

        sudo cp /usr/local/opt/rstudio-server/extras/launchd/com.rstudio.launchd.rserver.plist /Library/LaunchDaemons/
        sudo launchctl load -w /Library/LaunchDaemons/com.rstudio.launchd.rserver.plist

    2. install the PAM configuration
        sudo cp /usr/local/opt/rstudio-server/extras/pam/rstudio /etc/pam.d/

    3. sudo rstudio-server start

- In default, only users with id >1000 are allowed to login. To relax the
  requirement, add the following line to the configuration file located
  at `/etc/rstudio/rserver.conf`

    auth-minimum-user-id=500
==> Summary
🍺  /usr/local/Cellar/rstudio-server/1.2.5001: 1,366 files, 298.2MB
ここで、「To complete the installation of RStudio Server」ということを書いてあって、まだインストールは終わっていないらしい*4。
To complete the installation of RStudio Server
さらに以下の3行のコマンドを実行する。
$ sudo cp /usr/local/opt/rstudio-server/extras/launchd/com.rstudio.launchd.rserver.plist /Library/LaunchDaemons/

$ sudo launchctl load -w /Library/LaunchDaemons/com.rstudio.launchd.rserver.plist

$ sudo cp /usr/local/opt/rstudio-server/extras/pam/rstudio /etc/pam.d/
これで、RStudio Serverのインストールは完了で、ログインできるかと思いきや。ここでアクセスすると、うまくログインできない。

続けて、RStudio Serverの設定が必要である。
デフォルトではRStudio Serverの設定フォルダ、設定ファイルはない。
$ ls /etc/rstudio
ls: /etc/rstudio: No such file or directory
そこで、まずrstudioフォルダを作成する。
$ sudo mkdir /etc/rstudio
そして、rserver.confとrsession.confという設定ファイルを作成する。
rserver.confの作成・設定
まず、rserver.confを作成して、編集する。
$ sudo vim /etc/rstudio/rserver.conf
中身は下記の通り記載する。
www-address=127.0.0.1
auth-minimum-user-id=500
rserver.conf を保存して閉じる。
いちおう、中身を確認しておく。
$ cat /etc/rstudio/rserver.conf
rsession.confの作成・設定
次に、rsession.confを作成して、編集する。
$ sudo vim /etc/rstudio/rsession.conf
中身は下記の通り記載する。
r-cran-repos=https://cran.csiro.au/
session-timeout-minutes=0
rsession.confを保存して閉じる。「r-cran-repos」については好みのリポジトリを設定すると良い。
いちおう、中身も確認しておく。
$ cat /etc/rstudio/rsession.conf
ここで一度、RStusio Server Localhostが起動できてるかを確認する*5
$ sudo rstudio-server start
$ open http://localhost:8787   # あるいは open http://[IPアドレス]:8787
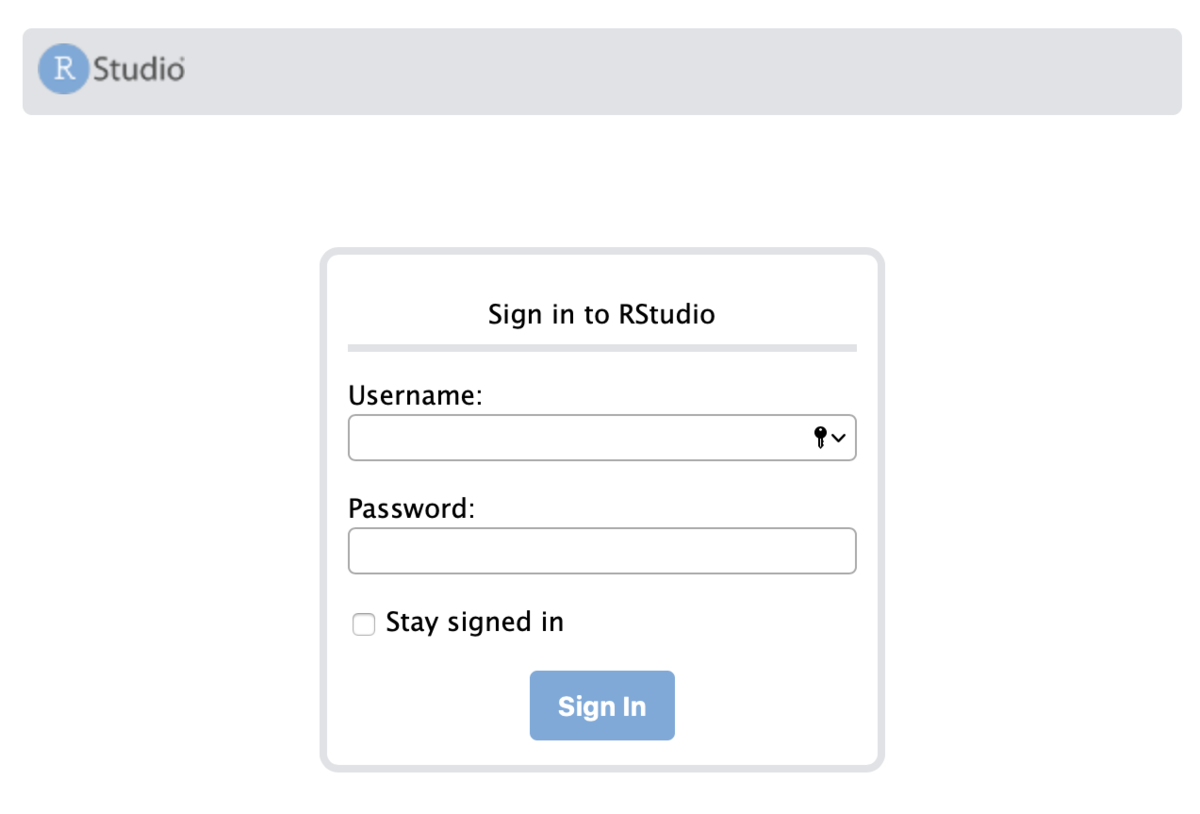
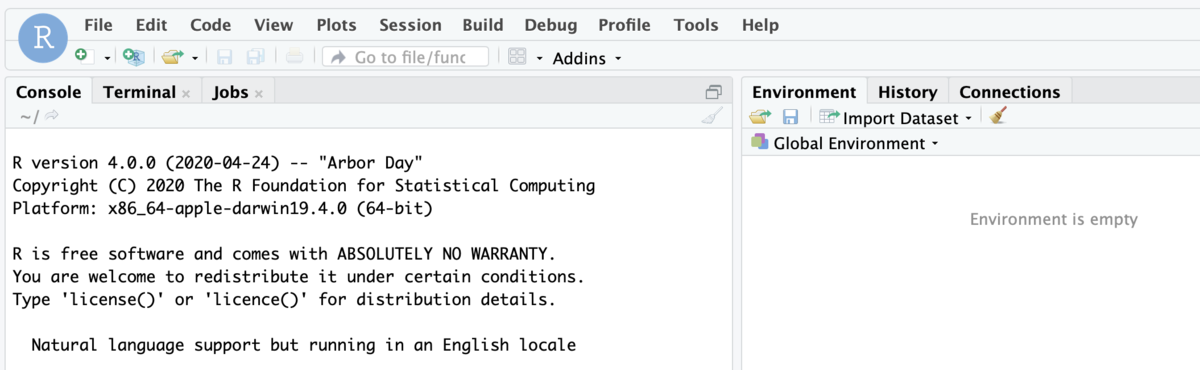
PCと同じ、User NameとPassworを入力すると、RStudioのインターフェイス画面に入れる。
ただ、2020年4月時点では、まだエラーが出る
OpenSSLのダウングレードとスイッチが必要である
こういう出力になって、Localhostにもアクセスできない場合の対処について説明する。
dyld: Library not loaded: /usr/local/opt/openssl/lib/libssl.1.0.0.dylib
  Referenced from: /usr/local/Cellar/rstudio-server/1.2.5001/rstudio-server/bin/rserver
  Reason: image not found
このとき、OpenSSLのバージョンがが、1.1 になっているはず。 インストールされているOpensslのバージョンを確認してみると
$ brew list openssl
/usr/local/Cellar/openssl@1.1/1.1.1g/.bottle/etc/ (7 files)
/usr/local/Cellar/openssl@1.1/1.1.1g/bin/c_rehash
/usr/local/Cellar/openssl@1.1/1.1.1g/bin/openssl
/usr/local/Cellar/openssl@1.1/1.1.1g/include/openssl/ (104 files)
/usr/local/Cellar/openssl@1.1/1.1.1g/lib/libcrypto.1.1.dylib
/usr/local/Cellar/openssl@1.1/1.1.1g/lib/libssl.1.1.dylib
/usr/local/Cellar/openssl@1.1/1.1.1g/lib/engines-1.1/ (2 files)
/usr/local/Cellar/openssl@1.1/1.1.1g/lib/pkgconfig/ (3 files)
/usr/local/Cellar/openssl@1.1/1.1.1g/lib/ (4 other files)
/usr/local/Cellar/openssl@1.1/1.1.1g/share/doc/ (3964 files)
/usr/local/Cellar/openssl@1.1/1.1.1g/share/man/ (3964 files)
確かに、OpenSSLのバージョンが1.1である。そこで、openssl 1.0.2t をbrewでインストールする*6。
$ brew install https://raw.githubusercontent.com/Homebrew/homebrew-core/64555220bfbf4a25598523c2e4d3a232560eaad7/Formula/openssl.rb
次に、openssl 1.0.2tに切り替えて、Active バージョンを確認してみる。
$ brew switch openssl 1.0.2t
$ brew list openssl
/usr/local/Cellar/openssl/1.0.2t/.bottle/etc/ (8 files)
/usr/local/Cellar/openssl/1.0.2t/bin/c_rehash
/usr/local/Cellar/openssl/1.0.2t/bin/openssl
/usr/local/Cellar/openssl/1.0.2t/include/openssl/ (75 files)
/usr/local/Cellar/openssl/1.0.2t/lib/libcrypto.1.0.0.dylib
/usr/local/Cellar/openssl/1.0.2t/lib/libssl.1.0.0.dylib
/usr/local/Cellar/openssl/1.0.2t/lib/engines/ (12 files)
/usr/local/Cellar/openssl/1.0.2t/lib/pkgconfig/ (3 files)
/usr/local/Cellar/openssl/1.0.2t/lib/ (4 other files)
/usr/local/Cellar/openssl/1.0.2t/share/man/ (1683 files)
これがうまくいけば、rstudio-server を再実行して、ブラウザで確認する。
$ sudo rstudio-server start
$ open http://localhost:8787   # あるいはopen http://[IPアドレス]:8787
「http://localhost:8787」とかをブラウザのブックマークとして保存しておくとアクセスが楽になる。
rstudio-serverのコマンド補足*7
$ sudo rstudio-server stop      # rstudio-serverの停止

$ sudo rstudio-server status    # rstudio-serverの状態確認
start、stop、status しか使わないので、簡単。
できればやってほしい、Nginxを使った8787ポートのリダイレクト設定
これをすることで、「http://localhost/rstudio/ # あるいはopen http://[IPアドレス]/rstudio/」でアクセスできるようになる。
nginx をインストールする
$ brew install nginx --ignore-dependencies
nginxの設定ファイルを作成して、編集する
$ vim /usr/local/etc/nginx/servers/default.conf
default.confには、下記の通り記載する。
server {
    listen 80;
    server_name localhost;

location /rstudio/ {
      rewrite ^/rstudio/(.*)$ /$1 break;
      proxy_pass http://localhost:8787;
      proxy_redirect http://localhost:8787/ $scheme://$http_host/rstudio/;
    }
}
default.confを保存して閉じる。
nginxを起動して、RStudio Serverを確認してみる*8
$ sudo nginx
$ open http://localhost/rstudio
これで、アクセスできればOK。 ただし、ローカルホストPCからの場合は、 open http://localhost:8787でもアクセス可能である。
念のため、別PCからもアクセスして確認してみる*9
「http://[IPアドレス]/rstudio」でアクセスできて、「http://[IPアドレス]:8787」でアクセスできないなら、大丈夫。

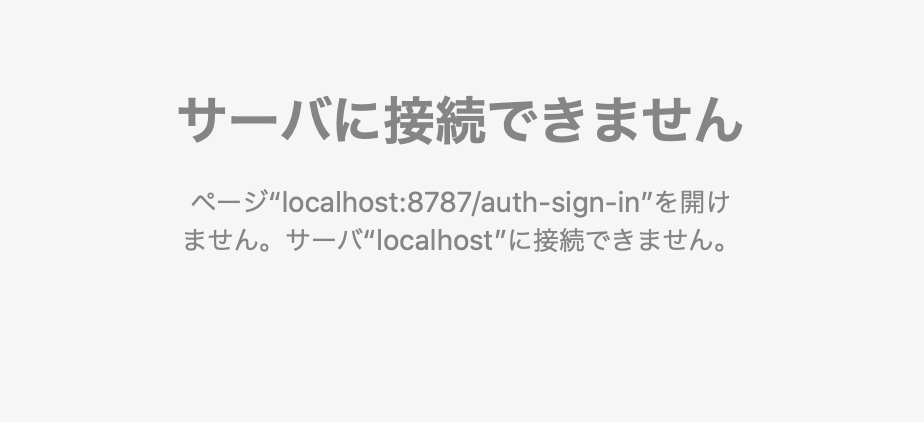
こんな感じで、8787ポートでアクセスできないなら、OK。
最後に
快適なRstudio Serverライフをお楽しみください。
補足(1)HPにアクセスして、RStudio Desktop をインストールする場合

1. R( R 3.0.1+)のインストール
2. RStudio Desktopのダウンロード
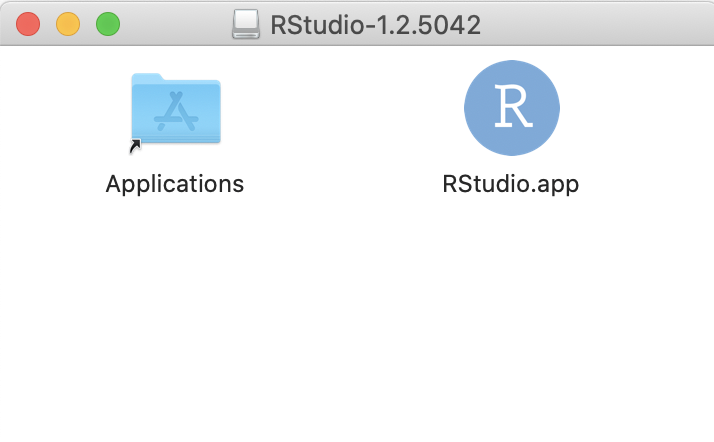
3. RStudio DesktopアプリケーションをApplicationフォルダにクリック&ドロップ
補足(2)Homebrewで、R/RStudiのデスクトップ版をインストールする場合
$ brew cask install r
$ brew cask install rstudio

#Appが既にインストールされている場合
$ brew cask install --force rstudio
完了後に、ApplicationフォルダにR/RStudioのアプリケーションが入っている*10。